How to Make a DressFor under $1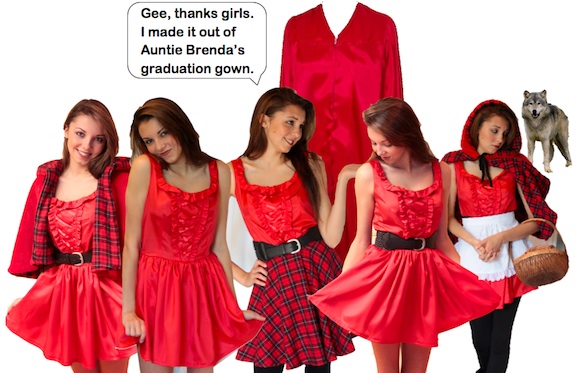 How to make a dress
|
More Dress Patterns
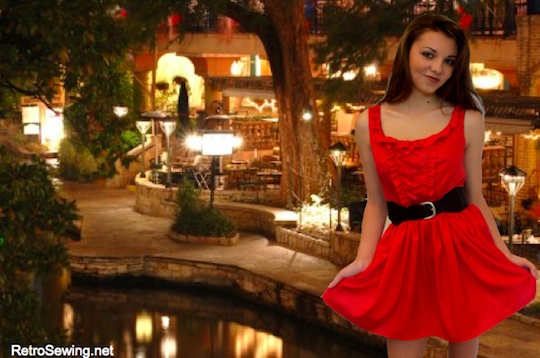
Skill: This dress is an easy sewing project for someone that has some sewing experience. In this example the pattern has been altered to my taste, but this dress could be done in just about any fabric for a whole new look. I started with the Little Red Riding Hood dress, but half way through Sierra mentioned it would be better sleeveless, and that solved the problem of not having enough fabric left from the graduation gown to do the sleeves. I was planning some kind of sheer for the original sleeves, but didn't use it on this dress (red sheer w/with polka dots.
Below is a full detailed description of this project "How to Make a Dress", with lots of photos and tips. For sewing tutorials and full details on how to sew the cape, skirt and apron, see the individual tutorials and details for each of them by going to: Sewing tutorials on these projects
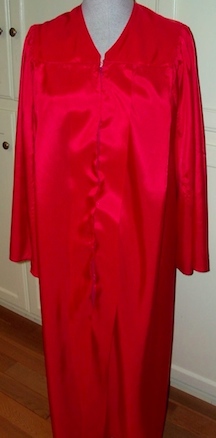
Out of Sister Bren's old graduation gown
FABRIC
The fabric for this dress is from my sister Bren's 30 yr old graduation gown. As I was shopping through my closets for red fabric for this Red Riding Hood/holiday dress, I hit the jackpot when I found this red satin graduation gown. I emailed my sister to tell her of the plan and she said go for it. Yhat was the beginning of "How to Make A Dress".
RECYCLING FABRIC
I must admit I had some trouble cutting into such a sentimental piece, but after 30 years of storage, it seemed right to give it new life, and that's part of what RetroSewing is all about. I wonder how many graduation gowns, bridesmaids dresses, and prom dresses, to name a few, are in closets and attic boxes. In most cases at least a couple of yards. That's a lot of fabric waiting to be given new life. Then there's the many details like pleats, buttons, ruffles, trims,etc, that can be put to good use.
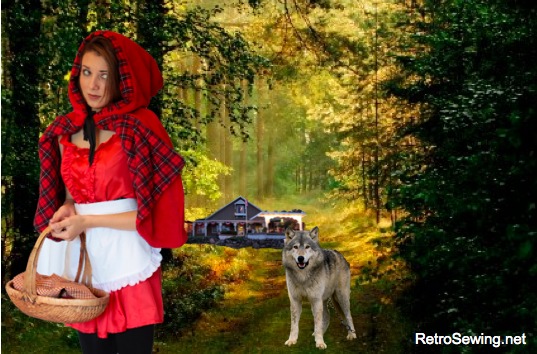
HOLIDAY DRESS & COSTUME
Since this was the final piece to the Little Red Riding Hood costume, and going to double as a holiday dress, the satin graduation gown was perfect! If you don't happen to have a graduation gown handy, then of course use whatever you like. Check the back of the Simplicity pattern package for fabric recommendations, but when creating your own designs anything is possible.
Holiday Dress & Costume
Since this was the final piece to the Little Red Riding Hood costume, and going to double as a holiday dress, the satin graduation gown was perfect! If you don't happen to have a graduation gown handy, then of course use whatever you like. Check the back of the Simplicity pattern package for fabric recommendations, but when creating your own designs anything is possible.
To grandmother's house we go!
The Pattern
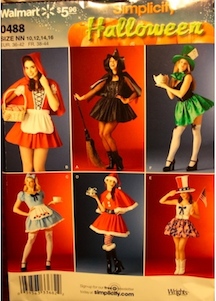
SIMPLICITY HALLOWEEN #0488
Make a dress using the pattern pieces from Simplicity's Halloween pattern #0488.
So far I've done the apron, cape and now the dress for the Little Red Riding Hood costume. That completes Little Red Riding Hood, although I plan to do several others, such as the witches hat (possibly out of leather or something like that).
As usual I changed a few things on the pattern, which is another reason this is considered intermediate sewing.
This dress includes steps from a combination of the costumes pictured on the cover. On this project I kept the colors to red, so it could be worn for occasions after Halloween.
Recommended Sewing Skills
In this project "How to Make a Dress", pattern pieces are changed, fabric is being recycled, and ruffles are made from scraps. These steps added on to the making of the dress are a lot to take on the first time.
Some people might attempt this project as a new sewer, and it could work out fine, just be prepared to review other pages as you go. Suggested pages in the works now, that could be helpful are, "Sewing Instructions", "Sewing Terms", and "Beginner Sewing Projects".
Layout
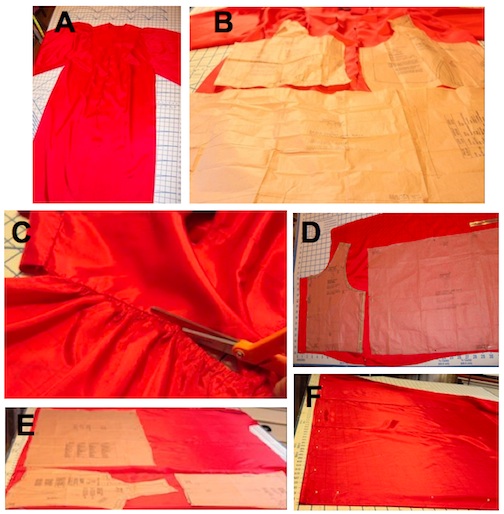
A. This is the graduation gown laid out for the purpose of analyzing the fabric and pieces. When laying out pattern pieces, take note of the grain lines, and make sure the pattern pieces are laying in the proper direction, according to the marked grain lines on the pattern pieces.
B. Just to get a rough idea, I laid out the pattern pieces on the gown as it is in view B. I determined there would be enough fabric to sew the dress, but the lining would need to come from somewhere else. SInce it's only about a yard and a half for the dress and less than another 3/4 of a yard for the lining, I knew this was doable. I would find the fabric for the lining in my stash.
C. Here I'm cutting the gown at the gathers, so that I can lay the fabric flat (could seam rip instead of cut). Pressing will be necessary on those gathers.
D. This is the gowns arm. Grad gowns have big arms, so there's a lot of fabric in them. Since I would be using the biggest pieces of the grad gown for the skirt, I got the smaller pieces, such as the front bodice pieces, out of the fabric from the arms.
E. The large rectangular pattern piece towards the back of the photo is the skirt pattern piece. There will be 3 of those.
F. This is a photo of the fabric squared on the grid. It's also pinned down to hold it in place while laying out the pattern.
This "How to Make A Dress" instruction is utilizing an old graduation gown, but you can use whatever you have. Check the pattern instructions for recommendations.
Making the Pattern & Making Darts
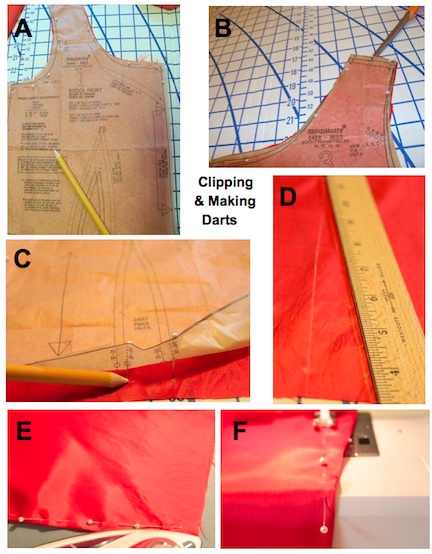
A. Mark and clip the bodice in several places on the bodice.
B. Clip shoulders, arms, and side seams where pattern indicates
C. Marking the dots on the darts.
D. Connecting the dots
E. Pinning and pressing the darts
F. Sewing the Darts (2 darts in front, and 2 in back).
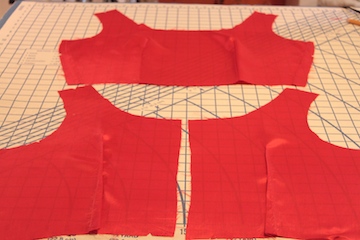
It Should Look Like This
Making the Inset
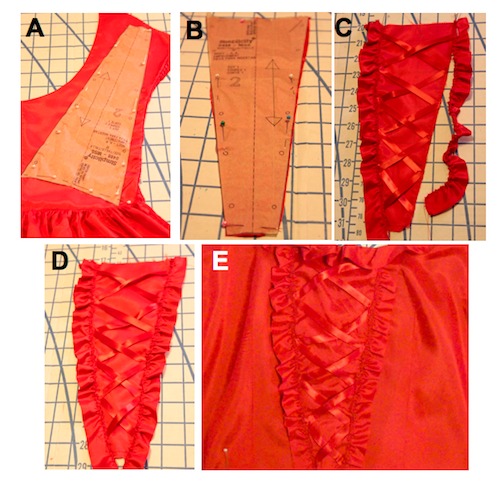
A. I used the upper shoulder area of the gown for the inset, and the grain was going the right direction. Barely fit the pattern piece, but it worked.
B. Cut it out & marked all the dots along the sides. The colored pins indicate where the dots are. That's where the ribbon will be criss-crossed, then sewn in place.
C. Here the ribbon is sewn in place, and the ruffle is attached along the edges, just over the edge of the inset as shown. This ruffle was made out of the scrap of the gown, but you can also use ready made ruffle as suggested in the pattern directions.
D. This is the inset complete and ready to sew to the bodice front.
E. Make sure the inset is centered on the bodice front, and sew it on.
Applying the Ruffle
Apply the ruffle to the neck edge as pictured here.
Lining

A. Sew the lining the same as the bodice.
B. Right sides together, pin, the lining to the neck edge of the bodice, matching centers and shoulder seams.
C. Stitch, trim seam and clip curves.
D. It should look like this
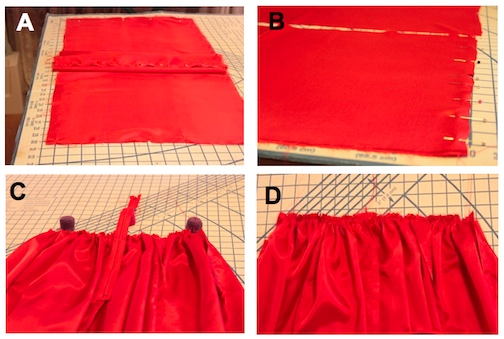
Making the Skirt
A. Cutting the three rectangular pattern pieces for the skirt
B. Sewing the right sides together at the seams. Sew from the notch to the hem on the back seam.
C. Sew a basting stitch 1/2" from top waist edge, and gather. This photo shows the zipper laid out.
D. Gather according to bodice top, matching notches and seams.
Putting It Together
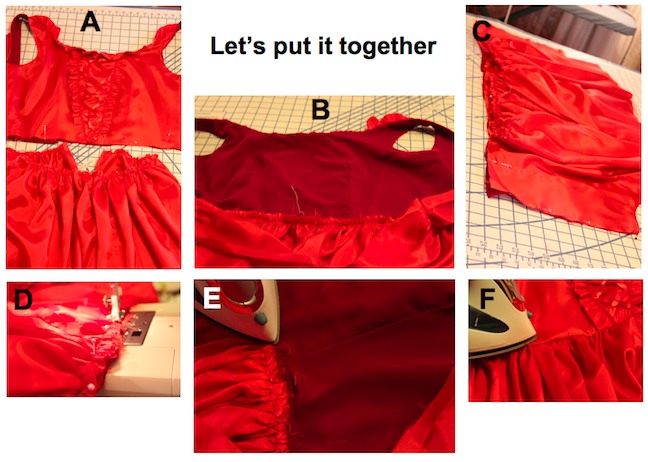
A. The bodice and the skirt are nearly complete, but before we can finish, it's time to put it together.
B. In this photo the seams and notches are matched, and the gather is adjusted to match the bodice.
C. Lay the skirt on top of the bodice right sides together, and pin them together.
D. Stitch the two pieces together.
E. Press seam down from inside
F. Press seam from the outside
Almost done with "How to Make a Dress"
Installing the Zipper
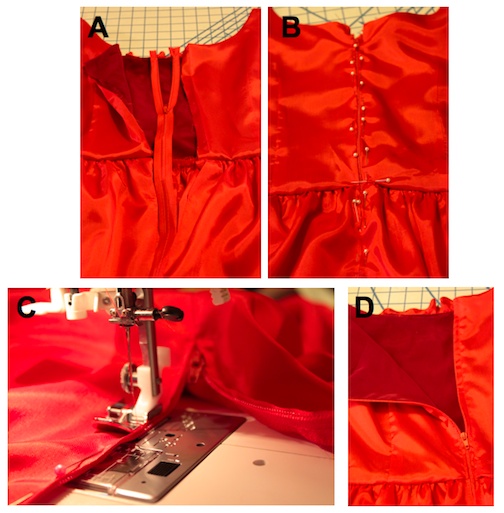
A. Place zipper 3/8" below neck edge. Bottom of zipper should end at notch.
B. Pin closed zipper under opening edges with tab end 3/8" below neck edge, having edges meet at center of zipper.
C. Sew 1/4" each side of center and across end, using adjustable zipper foot.
D. Should look like this.
Note: The pattern calls for zipper tape, but in this example of how to make a dress, I did not use zipper tape. It can make installing a zipper easier, but this installation went very smooth, and is also an option.
Hem
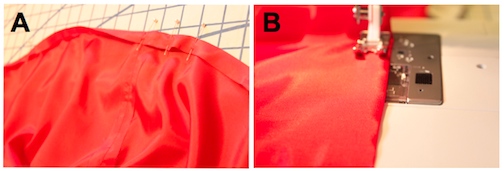
A. In this example I used 1/2" hem. Measure it using a measuring gauge, press, turn it another 1/2" for a finished look.
B. Stitch hem and done. This is one version of how to make a dress.
Note: A ruffle is also used at the hem line in some of the costumes on this Simplicity pattern.
How to Make a Dress
...and you're done!

Hope you enjoyed the instruction on how to make a dress. Happy sewing!!!
Subscribe with only your email
Sister Sites
