Make Holiday Apron This is how it started - The thought process View or Buy Patterns This is the thought process for "Make Holiday Apron". Want to look dressed up for the holidays, but need to cook, clean, greet guests, move packages, etc. Heels and bare shoulders don't always work, and then even if it does, and you find a nice Christmas dress, it's covered by the apron. This is the perfect solution. Dress comfortable and add a souped up apron to the mix. Aprons are a lot easier to make than a dress, and cost a lot less too. Washable Fabric View or Buy Patterns This is the thought process for "Make Holiday Apron". Want to look dressed up for the holidays, but need to cook, clean, greet guests, move packages, etc. Heels and bare shoulders don't always work, and then even if it does, and you find a nice Christmas dress, it's covered by the apron. The apron that will protect the beautiful dress. This is the perfect solution. Dress comfortable and add a souped up apron to the mix. Aprons are a lot easier to make than a dress, and cost a lot less too. After much deliberation I finally decided to make this adorable apron. It looks like a dress, and with the help of the pattern it should be no problem. Also wanted a holiday fabric that would be washable. After all it is an apron. Custom features: A) Line the whole bodice top with the red satin polyester fabric. B) Gather the skirt, go all the way around, and make it poofy. C) Change the waistband tie to a clasp that lays flat. D) Add white fur to neckline E) Add a black patten leather Santa Belt. MAKE HOLIDAY APRON STEP BY STEP INSTRUCTIONS BELOWVELVET * SEQUINS * SATIN * FUR A) The fabric is laid out, and folded according to the pattern directions, or close. The selvage is lined up along the corner and along the tables edge, (or T-square). If not square, trim the cut side until both sides are square and lines up to the tables edge, as in the photo above. Tools used here are either a T-square pictured here, or the edge of the cardboard table ($20). Two sides of most any table could be used too. B) In this photo you see that the fabric is folded over with WRONG sides together, and the fold is lined up according to the nearest straight line, so the fabric stays square. NOTE: I picked up some red silky (100% polyester) to line the bodice. I would make the neck ties out of the silky polyester too. Sequins could be uncomfortable around the neck so it made perfect sense (not that I have to make sense). All the details below on this page "Make Holiday Apron". Lay Out A ) Line up one end of the ruler on a set of straight parallel lines outside the fabric. Make sure to follow step 1 on laying out fabric. B) Find the grain line on the pattern. In exhibit B the ruler’s edge is lined up on the pattern grain line. C) Adjust pattern if necessary. When both ends line up, pin in place starting with a pin in the grain line. NOTE: Always minimize pin holes when possible. Line up the grain line on the pattern and the grain line on the fabric, parallel to the selvage. Cutting A) After properly laying out fabric and grainlines, pin down in several places, and cut each piece out. B) This is a photo of all four bodice pieces cut out. The red lining and the sequined velvet with RIGHT sides together.  Marking the FabricA) When all the pieces are cut, check each piece for necessary markings. B) Clip notches according to the size you're making C) For circles, I like poking the pin through the middle, as pictured here (cardboard table really comes in handy for this). D) Lift the pattern and the top layer of fabric, then press tip of marking pen up against the pin. In the process you are marking both pieces of fabric. Be sure to use a marker that comes out.  Red Satin Neck TiesA) Both ties with RIGHT sides together have been cut, marked, pressed in half lengthwise. B) Each tie is being sewn lengthwise and on only one side, leaving one side open. C) Turn the ties right side out (may need long stick popsicle stick or something to polk through fabric without damaging it. D) The neck tie on the right has been sewn and turned right side out. Neck tie on the left has been pressed, and ready for sewing. Assemble Bodice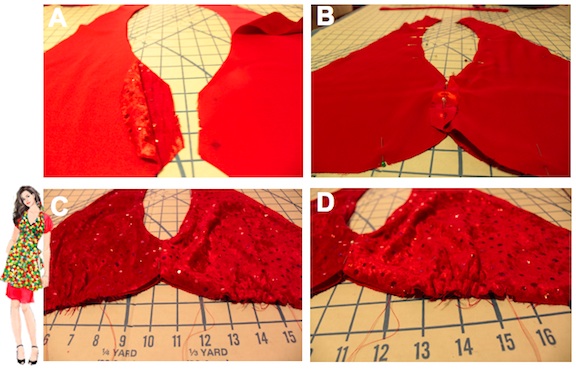 A) Photo A shows all 4 pieces of the bodice. The red sequin and the satin. The satin is a lining instead of the interfacing the pattern called for. There are also a set of dots in the center on each piece where the pieces will be sewn together. (sorry that color is a bit blaring in this photo). Place lining right sides together and stitch the middle from dot to dot. Then do the same with the fabric. B) Place the two bodices RIGHT (fabric and lining) sides together as pictured in view B. Sew all the way around, leaving the bottom open for gathering and attaching a band. C) After sewing and clipping where necessary, turn bodice RIGHT side out, and it should look like this. D) Use a basting stitch along the bottom of the bodice between the dots. Then gather and adjust as necessary on the next step, attaching the band. This is "Make Holiday Apron"  A) Using a basting stitch from one dot to the other along bottom of bodice. Leave long tails for gathering. Then gather. B) Place band right side down on the gathered section, matching markings, then pin. C) Adjust gather to fit the band. D) Sew in place. This is "Make Holiday Apron" Attaching the BandAfter thought A) Adding double sided interfacing for structure. Normally you would add the interfacing before sewing, but in this case it was an after thought, so here is the process. Cut a piece to fit between seam lines and press according to interfacing directions. Usually appx 10 seconds, or until it’s hot enough to pull the paper off. B) Pulling the paper off. If it doesn't come off easily, add a little more heat. C) Lay other side of band down over the interfacing glue. Press with hot iron. Use a damp cloth between iron and fabric if the fabric is especially delicate. NOTE: Earlier I added interfacing to give some structure to the band. Here I had to pull the band away from the interfacing just enough to tuck the top edge of the gathered skirt in. Then I layed the pressed, and the band down again, and it held everything in place for sewing. You're viewing "Make Holiday Apron" Try it on for size A) This view is close to the pattern, but much of the customizing still needs to be done. B) This side view shows what the apron looks like before the additional gathered skirt pieces are added. C) Here the skirt is doubled, gathered and attached inside the band. D) Fold band over the top edge of the skirt and sew. NOTE: Earlier I added interfacing to give some structure to the band. Here I had to pull the band away from the interfacing just enough to tuck the top edge of the gathered skirt in. You are viewing "Make Holiday Apron" Adding the Gathered Skirt A) I added another set of skirt pieces (1 front & 2 sides), which will allow for the fullness. All the pieces were gathered at the top and layed down inside the band. Notice the hem is lined up along the straight edge of the table. B) Lay the bodice (already attached to band) RIGHT side down, on top of the RIGHT side of skirt. Adjust skirt gathers evenly onto the band, pin and sew. C) In this view, you can see the bodice laying RIGHT side down on the skirt. Much of the gather is on the left side of the skirt. This side will overlap the other side in the back of the apron. D) Bring he other side of the band over the WRONG (back) side of the skirt, pin and stitch. You are viewing "Make Holiday Apron" Add Full Slip
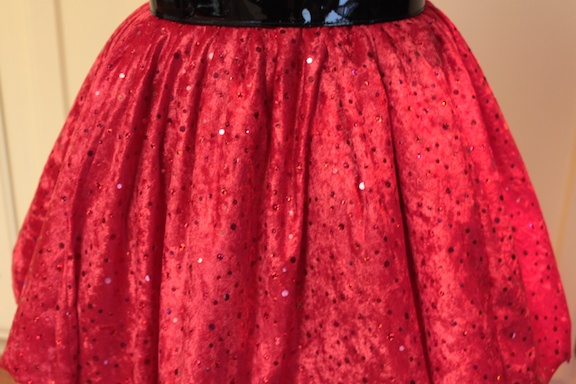 The slip will determine how full the apron will be. In this case I used a poodle skirt from an old costume for maximum drama, but that would be a matter of personal taste. Make Holiday Apron. Attaching fur & Adding belt
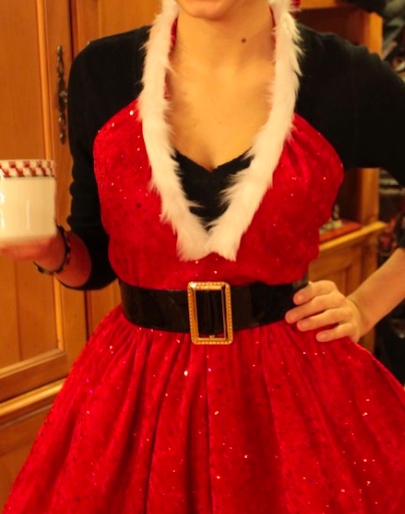
In this example I adjusted the straps to fit the model, and top stitched the white fur strip right over it. Not really the right way to do it, but that's a decision I get to make. It's an apron, not a wedding dress, so I cheated, and instead of sewing the fur into the seam, I added it on top. BLACK BELT This belt was purchased at a fabric store already made. Just trim it to size and your there. WAISTBAND CLOSURE Any type of closure clasp can work. Preferably something flat. Make Holiday Apron |
Subscribe with only your email
Home Page
Free Sewing Projects
Back to Top - Make Holiday Apron
Sister Sites
