How to Make a skirt
CHANGING THE PATTERN
This how-to-make-a-skirt page is the first of many easy sewing projects to come. Even if you're not making a poodle skirt, you can use this simplicity pattern to make a summer skirt or winter skirt, and really, most any kind of skirt you like. The pattern is the shape of a circle and makes for a fun twirly skirt. Great for doing the twist, swing or stroll (haha). How-to-make-a-skirt
How to Make a skirt cont'd
In this example, there will be no poodle, or felt fabric like you would see on a poodle skirt. You can follow these directions for a poodle skirt by using felt fabric, and avoiding the hem (time saver), and then adding a ready made poodle or make one using these pattern directions.
One of the great things about sewing is the flexibility you have to change many things about a pattern. This will be a summer skirt, using a cotton fabric.
This Simplicity costume pattern is an easy sewing project, and a great project for a beginner, although some basic sewing skills would be helpful. With his Simplicity pattern you:
a. Make simple seams
b. Install a zipper
c. Press fusible web to waistband
d. Attach waistband to the skirt
e. Sew on a clasp to waistband
f. Hem the skirt
An experienced sewer could probably make this skirt in a couple of hours (less if felt). A new sewer maybe double that (3 or 4 hrs). If you've never done any sewing, it would be best to get familiar with some basic sewing terms and info. Check out the "Free Sewing Instructions" page here on retrosewing. How-to-make-a-skirt
What You'll Need
How to Make a Skirt
Before buying a pattern, review the directions on the back of the package before purchasing. Then you know in advance what you need and if that's what you want to do. In this case, due to this easy sewing projects page you are now familiar, so you will need:
1. 1 1/2 to 4 yards depending on length of skirt and width of fabric.
2. 7" Zipper
3. Thread, Scissors, Pins
4. Washable Marker
5. Measuring Guage
6. Measuring Tape 7. Hook Closure (Waistband fastened)
8. Interfacing (fusible iron-on or sew-on)
9. Zipper-Tape or Double sided interfacing
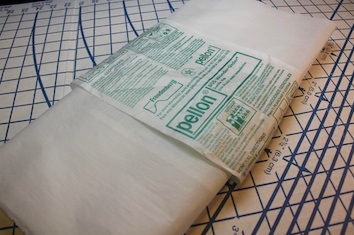
Note: Interfacing (pictured below) will be used in two different ways on this project. Two different types of interfacing.
Interfacing for waistband: This is the usual interfacing used for many sewing projects. In this case it will be ironed onto the waistband, giving it some weight and form.
Zipper Interfacing: This pattern calls for zipper-tape. Since I was unable to find zipper-tape at any of the fabric stores in my city or nearby, I decided to use the double sided interfacing quilters use. It's not only double sided, but you can sew it. If it is not sewable, you will gum up your needle and believe me it won't work. This is SEWABLE! Makes installing a zipper easier than ever. How-to-make-a-skirt
Choosing & Preparing the Fabric
When you purchase fabric, be sure to check the manufactures recommended care instructions (top of bolt). You'll want to know how to take care of your new garment and washing will be the first thing you do (before sewing). In the case of a fabric that would be dry cleaned, it wouldn't need to be done before sewing. If any shrinkage is expected (such as with cotton or linen), you definitely want to wash it and dry it first. Wouldn't want it to shrink after you've made it.
After washing and drying, press with iron. Not everyone does this, but for the best possible fit, it's recommended. The pattern lays down in place more easily too.
Press the iron without moving it around. Press, lift, move to next spot, and press and lift, and so on. This will avoid stretching the fabric, and again makes for a more precise fit in the end.
Any one of these steps missed and especially all steps missed can lead to a less than perfect fit.
If you are a beginner and would like to practice with an old sheet or something from around the house, then these steps can be skipped. Washing & drying has probably been done and pressing may not be as vital if the fabric lays flat. How-to-make-a-skirt
Read Pattern Directions
When you purchase fabric, be sure to check the manufactures recommended care instructions (top of bolt). You'll want to know how to take care of your new garment and washing will be the first thing you do (before sewing). In the case of a fabric that would be dry cleaned, it wouldn't need to be done before sewing. If any shrinkage is expected (such as with cotton or linen), you definitely want to wash it and dry it first. Wouldn't want it to shrink after you've made it.
After washing and drying, press with iron. Not everyone does this, but for the best possible fit, it's recommended. The pattern lays down in place more easily too.
Press the iron without moving it around. Press, lift, move to next spot, and press and lift, and so on. This will avoid stretching the fabric, and again makes for a more precise fit in the end.
Any one of these steps missed and especially all steps missed can lead to a less than perfect fit.
If you are a beginner and would like to practice with an old sheet or something from around the house, then these steps can be skipped. Washing & drying has probably been done and pressing may not be as vital if the fabric lays flat. How-to-make-a-skirt
Adjust Pattern Length
This skirt pattern comes pretty long. After all, back in the 50's when the poodle skirt was made popular, skirts were not worn above the knee. Regardless of that, we are all different heights so shortening a pattern is not unusual.
I find the best way to shorten a circle skirt like this, is to fold it several times, as pictured here. Then cut according to the desired length.
If you intend to use this pattern for many future projects, you may want to fold it instead of cut, although that can get bulky. In my case, I cut it, and saved the cut off piece for possible reattachment in the future. Then if you want it shorter, you can fold it over much easier. How-to-make-a-skirt
Place & Pin Pattern
Review the pattern and find the fabric layout that will best suit your fabric width and design. Be sure the fold lines on the pattern are along the folded side of the fabric. Review the legend for the meaning of each of the markings on the pattern. How-to-make-a-skirt
Once the pattern pieces are laid out, pin them down. Be careful not to move the pattern off it's mark. Selvages (machine edge of fabric), grain lines and fold lines should all be kept in mind. Start the pinning at the most critical point. I usually start at the grain line with just a couple of pins to hold it in place, then work out from there, keeping the pattern pieces and the fabric smooth and free of wrinkles. How-to-make-a-skirt
Cutting Out the Pattern
Next cut the pattern out, opening the scissors wide and closing, avoiding lots of little choppy cuts. That way your seams will be even, more precise, and look much more professional. It's the little details like this that make a difference in the end result.
Keep a good pair of medium size scissors for sewing only. I mark them "sewing only", so desperate family members don't borrow them for who knows what. Even using them to cut paper can dull them quickly, so keep an extra pair in your sewing room for cutting anything other than fabric. How-to-make-a-skirt
Marking & Clipping
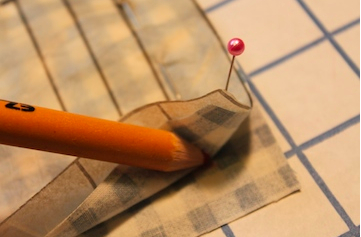
Next mark the areas on the pattern that call for marking. Use your favorite marking tool. You can use chalk, pencil, pens, or carbon paper. How-to-make-a-skirt
Clip the notch that marks where the zipper will be placed.
Mark the spot on the waistband for your appropriate size. As a precaution in addition to measuring your waist, hold up the pattern piece around your waist to double check it for fit.
Place a pin through all the layers, then lift the pattern and the first layer of fabric, mark both pieces of fabric (wrong side of fabric).
The pattern doesn't usually call for it, but it's extremely helpful to mark the fabric with a big B (for back)on the back of skirt, and a big F (for front) on the front of the skirt. Use washable marker of any kind just large enough to make it easy to spot. The marker should be a contrasting color to the fabric. Later when you're looking to put the pieces together for sewing, this marking will make it much easier to find. How-to-make-a-skirt
Stay-Stitch Waist
Stay-Stitch upper edge of waist 1/2" from cut edge following arrows (see pattern illustration instructions). Use a basic stitch. This will keep the fabric from stretching, and possibly distorting it, and again possibly making for a less perfect fit.
With right sides together stitch skirt front to skirt back at left side seam, stitching from lower edge to notch, using 5/8th" seam. Be sure to back stitch at each end to reinforce the seam. Most sewing projects will include a 5/8th" seam. How-to-make-a-skirt
Let's Put it Together
Zipper Prep
How to Install Zipper Video
Before sewing on the zipper, make sure the zipper works. It's not often, but it does happen occasionally, that a zipper doesn't work. Just give it a couple of zips and your good to go.
Check back for "Easy Sewing Projects Video". How-to-make-a-skirt
Zipper Placement
Press under 5/8" on left front opening edge where zipper will be placed, and 1/2" on left back opening edge where zipper will be placed. This is a continuation of the left seam you just stitched (from notch to waist).
Pin left back edge to zipper tape, placing pressed edge close to zipper teeth and tab end of zipper 1" below upper raw edge of skirt waist. Baste.
Pin and baste left front edge to zipper tape, lapping left front 1/8" over left back.
After basting, check the zipper position and if it looks good, stitch as basted using an adjustable zipper foot to apply.
Coming soon - Easy Sewing Project Video on how to make a skirt. How-to-make-a-skirt
Placing Zipper
How to Install Zipper Video
Sew the other seam
With right sides of fabric together, stitch skirt front to skirt back at right side seams.
More easy sewing projects coming soon.
Waist Band Interfacing & Attatch to Skirt
Sew Waistband Video
Notice the waistband of the skirt here. This is where the waistband with the attached interfacing will be placed.
Fusible interfacing (iron on) - Follow directions on package for the fusible interfacing you're using. I like to use a damp cloth, to get a solid contact between the waistband and the interfacing. Just soak a small clean cotton or linen cloth (without color), about the size of the iron or better yet the size of the waistband, then wring it out and lay it on the interfacing.
Press the iron firmly for a few seconds, until somewhat dry, then lift the iron, move it to the next section and do the same. Avoid stretching the fabric by pressing, not ironing. Press under 5/8 " on long unmarked edge of waistband and trim to 1/4".
Non-fusible - Machine-baste 1/2" from cut edges. Trim interfacing close to stitching. To hold interfacing in place, machine-baste 1 3/4" from long unmarked edge. (This stitching will be on the underside when waistband is finished. How-to-make-a-skirt
With right sides together , pin garment to band, matching centers, placing opening edges at outer small dots and right side seams at remaining dots. Baste easing garment to fit. How-to-make-a-skirt
Turn band, push out corners and press.
The pattern calls for slip-stitching edge of waist band over seam. I used a zig-zag stitch in this example. To make this an even easier sewing project, we zig-zagged the waistband, instead of hand sewed it. For something more formal I would go with a slip stitch (hand stitch), but it's all a matter of preference.
Lap ends of band for placement of hook closure: Hand sew on hook closure
Sew on Closure
Hem
Set your measuring gauge at 1/2 inch or so. Use the iron to press the hem in place, while measuring 1/2 inch all around the hem of the skirt.
For a finished look, fold the hem over another 1/2 inch, measuring and pressing as you go. When done, sew in place. In this example a zig-zag stitch was used. Some prefer to sew the hem by hand using a slip stitch. You can also add ruffles or whatever you like. The hem can take a little time because of the fullness of the skirt. Remember, if your using felt, and doing a poodle skirt, no hem will be necessary, making it even easier sewing project.
Is this adorable, or what?
A FEW WORDS OF ENCOURAGEMENT
Even easy sewing projects like this "how to make a skirt" project can be challenging unless you go into it with the right attitude. Meaning patience and time. Try not to attempt any sewing project, even if it's considered an easy sewing project, when hurried or with the idea that you will finish before the party tonight. If you are very experienced maybe, but even then unexpected things can happen. It's definitely not practical for a beginner to start sewing with this kind of pressure, and it could be discouraging. Sewing, designing and creating master pieces can be very rewarding, and even therapeutic if you go into with the right attitude. So remember, easy sewing projects or not, allow the time and go into it with the right attitude.
A beginner may need to refer to definitions and basic sewing terms, which can be found either here at www.thediyeffect.com or on the pattern itself.
Check in for more easy sewing projects coming soon. Happy Sewing!
Back to Top - How to make a skirt
|